

30–60 Minute Fix or Instant Hack: Duvet Corner Ties, Gentle on Fabric
Sewing internal corner ties gives the most reliable long-term fix for a shifting duvet, non-piercing clips are the fastest fix you can buy, and the roll method solves the problem in under a minute with no purchase at all. Sewn ties suit heavy inserts and heirloom covers, clips suit renters or anyone who cannot sew, and the roll method works best as a stopgap between washes.
Table of Contents
- What are duvet corner ties and how do they stop shifting?
- At a glance: buy vs make vs quick hacks
- How to sew internal corner ties step by step
- How to fit clips, snaps and donut grippers
- Choosing the right materials and where to buy them
- Troubleshooting: when ties fail and how to fix them
- Choosing a premium cover with built-in ties
- A bedding brand’s honest take on the best trade-off
- Skip the DIY: Roomie Design covers built with ties already in place
- Sources
- FAQ
What are duvet corner ties and how do they stop shifting?
Duvet corner ties are short lengths of fabric tape or ribbon, sewn or clipped at the inside corners of a duvet cover, that anchor the insert so it cannot slide, twist, or bunch into one end overnight. Most covers pair four ties on the cover with four matching loops on the insert. You knot or clip the two together at each corner, and the insert stays put through a full night of tossing and turning.
The mechanism is simple: a duvet insert is loose fill or wadding inside a fabric shell, and without an anchor point it migrates towards whichever corner gets pulled hardest during sleep. Ties or clips fix the four corners in place, which keeps the insert evenly distributed and stops that lumpy, cover-slipping-off-the-corner problem that ruins an otherwise good night’s sleep. Multiple how-to guides on fitting duvet covers point to exactly this as the reason ties exist at all, and why beds with them stay neater for longer between refitting.
Not every cover comes with ties fitted, and not every insert has matching loops. That is where the practical choice comes in: sew your own, buy clips, or rely on a folding technique that needs neither.
At a glance: buy vs make vs quick hacks
Before working through any tutorial, it helps to know which method actually suits your situation. Each option trades off differently across four things that matter: how long the fix lasts, how fast you can do it, whether it risks the fabric, and what it costs.
- Durability: sewn ties last for years and survive repeated washing; clips can loosen after heavy laundering; the roll method offers no lasting hold at all, since nothing is fixed in place.
- Speed: the roll method takes seconds, clips take a couple of minutes per corner, sewing takes 30 to 60 minutes for a full set of eight ties.
- Risk to fabric: sewing needs a needle through the seam allowance so there’s no risk to the visible fabric; pinless clips grip without piercing anything, making them the safer choice for delicate or expensive weaves; the roll method touches the fabric with nothing but your hands.
- Cost: sewing costs next to nothing if you already own tape or ribbon; clips run to a modest multi-pack price; the roll method is free.
Sewing wins when durability matters more than speed, particularly for anyone with an active sleeper in the house or a heavy, high-fill duvet that needs a firmer anchor. Clips make more sense in a rented flat where you cannot alter the cover, or simply when sewing is not something you want to take on. The roll method earns its place as the fastest fix for an occasional problem, such as a spare-room duvet that only shifts once in a while, rather than a permanent solution.
A rough way to match yourself to a method: families with children or restless sleepers tend to get the most value from sewn ties, because the hold has to survive real movement every night. Renters, or anyone managing several covers across a household, generally do better with clips, since they move between beds without altering the fabric. Anyone who just wants tonight’s bed sorted, with no lasting fix required, reaches for the roll method and worries about it later.
How to sew internal corner ties step by step
Sewing your own ties is the method that lasts. Once fitted, they survive years of washing and holding an insert firmly in place, which is why it remains the standard fix recommended across most DIY bedding tutorials.
Supplies you will need:
- Cotton tape, grosgrain ribbon, or bias tape, roughly 1 to 1.5 cm wide (avoid satin, which slips loose when tied)
- Enough tape for eight ties at around 50 cm each, four for the cover and four for the insert, following the standard length used in most sewing tutorials
- A sewing machine or needle and strong thread
- Pins or fabric clips to hold ties in place while stitching
- Scissors and a lighter or fray-check sealant for finishing tape ends
Steps:
- Cut eight lengths of tape at 50 cm and seal or fold each raw end so it will not fray after repeated washing.
- Turn the duvet cover inside out and locate the four inside corners where the opening and the closed end meet.
- Position one folded tie at each corner, tucking about 2 cm of the tape into the seam allowance so the fold sits flush against the corner point.
- Machine stitch a small rectangle or an X shape over the tucked section, back and forth two or three times, to lock the tie into the seam.
- Repeat at all four corners, then decide whether to add optional side ties along the long edges for extra grip on wider covers.
- Turn the insert right side out and mark the same four corners, then hand or machine stitch a matching loop or tie at each point.
- For thick, high-fill inserts, hand-stitch the loops rather than forcing them through a machine, since a needle can struggle with dense wadding and a hand stitch gives you more control over placement.
- Turn the cover right side out, fit the insert, tie or knot each pair of corners together, and check that the insert sits flush in all four corners before smoothing the cover over the top.
Pro Tip: Use a bar tack, several tight zigzag stitches over the same spot, rather than a single straight seam. A bar tack spreads the pulling force across more thread, so the tie is far less likely to rip free after a few months of nightly tugging.
Once fitted, ties add no extra care burden. Wash the cover as normal; the tape will not fray if the ends were sealed properly, and the reinforced stitching at each corner should outlast several duvet covers’ worth of washing cycles. If you want the ties to disappear visually, tuck the knotted ends inside the corner pocket once tied, rather than letting them hang loose against the outside of the cover.

How to fit clips, snaps and donut grippers
Buying ready-made fasteners is the quickest route to a secure duvet if sewing is not something you want to do. Three main types dominate the market, and each behaves differently once fitted.
Pinless two-piece clips grip both layers of fabric between two curved plastic or metal arms, closing with a squeeze rather than a pin or needle. They are the safest option for delicate or expensive covers, since nothing pierces the fabric, and the discreet profile means they barely show once fitted.
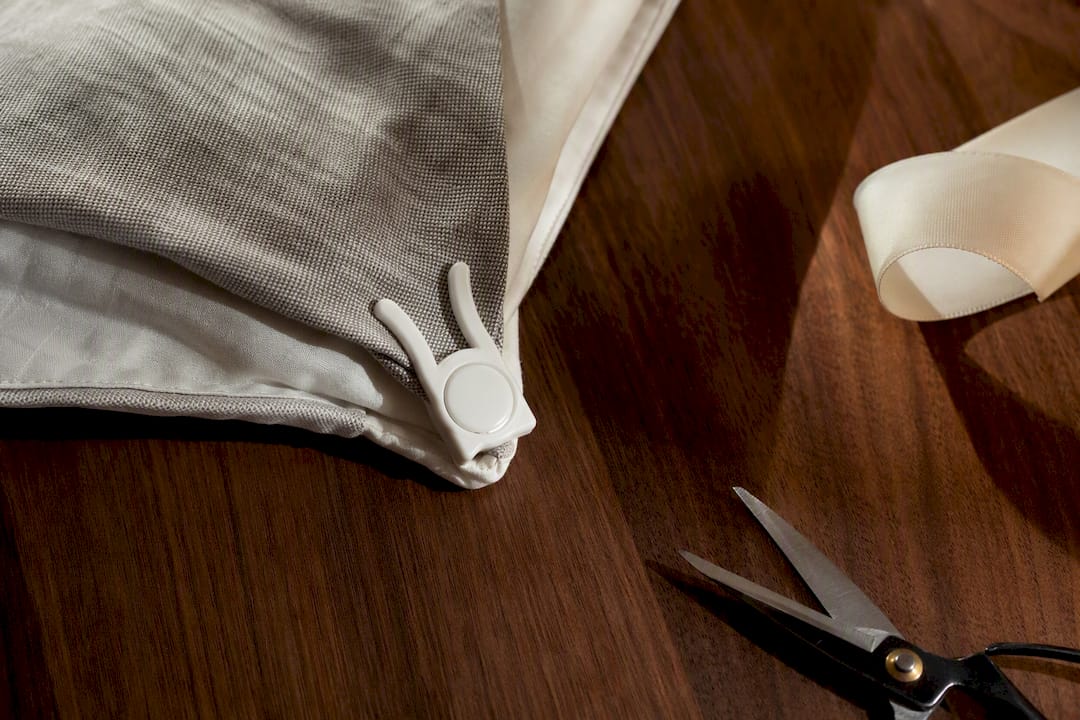
Donut grippers work on a similar non-piercing principle but use a rounded, ring-shaped grip that pulls both layers through a central hole, cinching them together. They tend to hold slightly more fabric bulk than flat clips, which makes them a reasonable choice for a plumper duvet.
Snap fasteners are sewn or riveted permanently into the fabric, functioning much like a poppers on a coat. They offer the strongest hold of the three but require altering the cover, so they sit closer to a semi-permanent fix than a quick buy.
Fitting steps for pinless clips and donut grippers:
- Turn the cover inside out and locate each corner where cover and insert meet.
- Gather a small handful of both layers together at the corner point.
- Squeeze the clip or gripper open, slide it over the gathered fabric, and release so it closes around both layers.
- Check the grip by gently tugging the corner; the fabric should not slip free.
- Repeat at all four corners, then turn the cover right side out as normal.
Clip listings commonly state a maximum fabric thickness they will reliably hold, often around one inch (25 mm) of combined fabric and fill, and most are sold in multi-packs of four, six, or twelve to cover several corners or more than one bed. Checking that thickness limit against your own duvet’s bulk before buying saves a wasted purchase.
After washing, clips can occasionally loosen or shift position, so it is worth a quick check each time the cover comes out of the dryer: reposition any clip that has slid away from the corner point, and replace one that no longer springs back into shape. Pinless designs are built specifically to avoid marking or snagging delicate weaves, which is why they remain the preferred choice for anyone nervous about altering a premium cover.
Choosing the right materials and where to buy them
The tape or ribbon you choose for sewn ties matters more than most people expect. Grosgrain ribbon and cotton bias tape both hold a knot securely and resist slipping loose overnight, which makes either a dependable choice for most cover weights. Twill tape, slightly stiffer, suits heavier inserts where a firmer anchor point matters. Satin and other slippery ribbons look attractive but tend to work themselves loose after a night of movement, so they are best avoided for anything doing real work.
If you are buying clips rather than sewing, a few details on the product listing are worth checking before you commit:
- The stated maximum fabric thickness, so it matches your duvet’s actual bulk rather than a slim summer quilt
- Whether the design is explicitly non-piercing, particularly important for silk, linen, or other fine weaves
- Pack count, since four corners need four clips at minimum, with extras useful for side ties or a second bed
- Material of the clip itself; smooth plastic or coated metal is less likely to snag fine fabric than raw edges
Sizing the ties themselves comes down to one measurement: the thickness of your insert once it is fully lofted. A slim, low-fill duvet needs shorter ties, since there is less bulk to wrap the knot around, while a plump, high-fill insert needs the fuller 50 cm length to leave enough tape for a secure knot. Checking your duvet insert’s construction before buying tape helps you avoid cutting ties too short and having to redo the job.
Standard practice across most tutorials and product listings is four corner ties as the minimum, with optional side ties added along the long edges if the insert is prone to bunching in the middle rather than just the corners. For a full guide to matching cover dimensions to insert size before you start, Roomie Design’s duvet cover size guide walks through the measurements that matter.
Troubleshooting: when ties fail and how to fix them
A tie that has started pulling loose from the seam is usually the first sign of trouble, often noticeable as a small gap opening up around the stitching after a few months of use. Catch it early and a simple reinforcement, a fresh row of backstitch or a bar tack over the original stitching, will usually restore full strength without needing to replace the whole tie.
Clips deserve a quick check after every wash, since the tumbling motion of a dryer can nudge them away from the corner point or, occasionally, mark a delicate fabric if they have shifted onto a seam rather than gathered fabric. Reposition any clip that has drifted, and replace one that no longer springs shut firmly.
Sewn ties that keep failing on the same corner, despite reinforcement, usually point to a fabric or fill mismatch rather than a stitching fault. A heavier insert than the cover was designed for puts more strain on every knot, so switching to wider tape or adding a second reinforcing stitch at that corner solves most recurring problems. If the duvet insert itself has changed, a seasonal swap to a heavier fill, for instance, it is worth checking the bedding lifespan guide for washing routines that keep both ties and fabric in good condition for longer.
Pro Tip: If a corner keeps failing no matter how you reinforce it, fold the tape into a double layer before stitching rather than using it single. Two layers of tape spread the strain across more fabric and typically outlast a single-layer repair by a wide margin.
Choosing a premium cover with built-in ties
The simplest long-term fix skips the sewing kit altogether: choose a cover that already has ties fitted at manufacture. Some duvet cover sets come with corner ties built in, which means there is no seam to reinforce, no tape to source, and no clip pack to buy separately.
Premium construction also changes how those ties age. A well-made cover in a quality cotton or linen weave holds stitching far more securely through repeated laundering than a thin, loosely woven fabric, so the ties keep their strength wash after wash while the fabric itself keeps its softness and drape. That combination, sturdy ties and a fabric hand that stays comfortable against the skin, is exactly what separates a cover built to last from one that needs constant repair.
Getting the fit right still matters more than the tie construction itself. Match your cover size precisely to your insert using Roomie Design’s bedding sizing guide before buying, since even the best-built ties cannot compensate for a cover that is simply the wrong dimensions for the duvet inside it.
A bedding brand’s honest take on the best trade-off
Most customers do not want a sewing project. A premium cover with built-in ties removes the whole problem before it starts, and that convenience is worth paying for if you want a clean, lasting result without touching a needle. Clips earn their place too, particularly for renters or anyone testing out a cover before committing to it long-term. Sewing is worth the effort mainly for heirloom pieces or unusually heavy inserts, where a custom fit beats anything bought off the shelf. If a ready-made solution appeals more than a DIY afternoon, the product pages are the quickest route there.
— Roomie Design
Skip the DIY: Roomie Design covers built with ties already in place
Some duvet cover sets ship with corner ties already fitted, so there is nothing to stitch and nothing extra to buy before your duvet stops shifting.

The Simple Embroidered Duvet Cover Set in Silver/Grey pairs a soft, richly woven cotton finish with ties sewn into every corner, so the insert stays anchored night after night without a single loose seam to worry about. For a bolder, more formal bedroom, the Elite Silver Corner Hotel Duvet Cover Set brings the same built-in tie construction to a hotel-inspired finish that holds its shape and its softness through repeated washing. If a warmer palette suits your room better, the Simple Embroidered Duvet Cover Set in White/Brown offers the identical tie design in a different colourway, so the choice comes down entirely to your bedroom’s look rather than any difference in how securely the ties hold.
Whichever set you choose, check your insert’s exact measurements against the size chart before ordering. Ready-made ties still need a cover that matches the insert, and getting that right the first time means your new duvet cover set works perfectly from the very first night. Browse the current sets and pick the colourway that suits your bedroom to get started.
Sources
For readers who want to see the sewing steps in full photographic detail, the DIY duvet cover corner ties tutorial walks through stitching and reinforcement with clear step-by-step images. Anyone moving house and finding their duvet shifts more than usual afterwards might find the mattress packing guide useful for handling bedding safely in transit. For sizing help before buying or sewing, Roomie Design’s duvet cover explainer covers fabric choice and fit in more depth.
- How to Use Duvet Cover Ties: Easy Bedding Tips – Cover Advice
- Ties for a Duvet and Duvet Cover | Komok
- Duvet corner clips – Kylee & Co
- Amazon
FAQ
What are duvet corner ties for?
They anchor a duvet insert to its cover at each corner, stopping the insert from sliding, twisting, or bunching into one end during the night.
How do you secure duvet corners without sewing?
Non-piercing clips or donut grippers clamp both layers of fabric together at each corner in under a minute, with no stitching or alteration to the cover required.
How do you add corner ties to a duvet cover?
Cut eight lengths of cotton tape or grosgrain ribbon at around 50 cm, sew four to the inside corners of the cover and four matching loops to the insert, then knot each pair together once fitted.
How can you tie duvet corners without existing loops?
If the insert has no loops, hand-stitch a small fabric loop or tie point at each corner yourself, or fit a pinless clip that grips the insert fabric directly without needing a loop at all.
Are sewn ties or clips better for a heavy duvet?
Sewn ties generally hold heavier, high-fill inserts more reliably than clips, since clips can struggle to grip very thick or dense fabric edges securely over time.


